Getting Started with OpenBCI
In October, I pre-ordered an OpenBCI, billed as the open-source brain-computer interface for makers. It arrived a few days ago, and after some technical hurdles, I’ve completed my initial tests.
What follows is a tutorial on setting up and testing your OpenBCI. The official documentation is still a work in progress, and I had to do a lot of troubleshooting to get my OpenBCI functional and tested; I hope this article helps you get yours running with less headache.
I’ve made this tutorial as clear but comprehensive as I can, but it doesn’t cover everything. Before you start, it’s good to have basic knowledge of the command line if you’re using Linux (this command line crash course may help); however, if the stereotypes of Linux users are true, you probably already know all about it. (A non-hostile relation to computers and their many idiosyncrasies will be useful as well, or perhaps a PhD in Googling and the Investigation of Obscure Errors…)
For those who’ve been reading my [Background on the Brain series](http://www.autodidacts.io/tag/background-on-the-brain/): don’t worry, the series is still vital. I’m interrupting myself because I think this post will be more interesting and immediate for most of the neuronuts out there, and also because I lost most of the Background on the Brain post I was about to publish in a technical glitch, and it will take some time to re-write it.Table of Contents
- Introduction (you’re past that, thankfully)
- Table of Contents ( you are here)
- What Is The Openbci Again?!
What is the OpenBCI again?!
The OpenBCI is a device that lets (mostly) ordinary artists, tinkerers, or neuroscience researchers measure the electrical activity of their muscles, heart, and brain.

The OpenBCI bridges the gap between three previous categories of brain-computer interfaces: Consumer devices, such as the Emotiv, NeuroSky, and Muse headsets, homebrew designs, such as the OpenEEG project, for more confident engineers, and systems for research or clinical use, which cost thousands of dollars.
The OpenBCI arrives pre-assembled and tested, and is relatively straightforward for someone without previous BCI experience to get started with — no soldering, hair-tearing, or midnight coding sessions need apply. I should note, though, that it’s not quite as gentle of a learning curve as I was led to expect: it’s not plug ‘n play and it’s fairly complex for a beginner, so there’s a lot to learn.
The OpenBCI’s software and hardware are open-source, which gives tinkerers huge flexibility in how they use it. The hardware can be modified and improved, just like homebuilt systems. You can use the OpenBCI’s app, connect the board to a wide variety of existing processing and display software suites, or, if you’re feeling ambitions, write custom software for your needs.
Finally, the OpenBCI’s output is far closer to clinical or research grade than most consumer or amateur systems: It has an excellent sample-rate (250 Hz), works with well-established processing and display software, and can be used with any electrodes with industry-standard “touchproof” connectors, so you aren’t stuck with the type it comes with.
You can learn more about the OpenBCI from their website, and the page from their successful Kickstarter crowd-funding campaign. If you don’t have an OpenBCI, boards from the first manufacturing run are still available on their website.
Download and Install the Software
Download the latest version of the software for your operating system from the OpenBCI Downloads Page.
Follow the installation instructions on the OpenBCI Docs Page for your operating system. I had trouble with bugs in the official Linux software, and it took me a while to get it working. If the official instructions don’t work for you either, try the steps below.
Getting the OpenBCI Software Working on Linux
The official OpenBCI GUI (graphical user interface) is written in Processing, which I didn’t have much experience with. It turns out one of the libraries bundled with the software is out of date (at the time of writing), and in order for it to be allowed to connect to the serial port, the application has to be run “as root” to be given the necessary security privileges. Here’s how I got it running.
- Download the .zip of the Linux application and extract it into your home folder.
- Download the updated version of the jSSC library. I used jSSC version 2.6.0, which you can download here. When the download finishes, extract the .zip file.
- Install a Java Runtime Environment — a program that runs programs written in Java — if you don’t already have one. You can do this from the software center if you’re on Ubuntu, or with the terminal command
sudo apt-get install default-jre. - Open the OpenBCI app folder (called
application.linux64unless you renamed it) and navigate into thelibfolder. Move or delete the file namedjssc.jar. This is the out-of-date library. - Replace the file you just deleted from
application.linux64/libwith the file calledjssc.jarin the folderjSSC-2.6.0-Releasethat you just downloaded and extracted. - Start the OpenBCI application with sufficient privileges to access the serial port. Assuming that you extracted the OpenBCI software into your home folder, this can be done with the command:
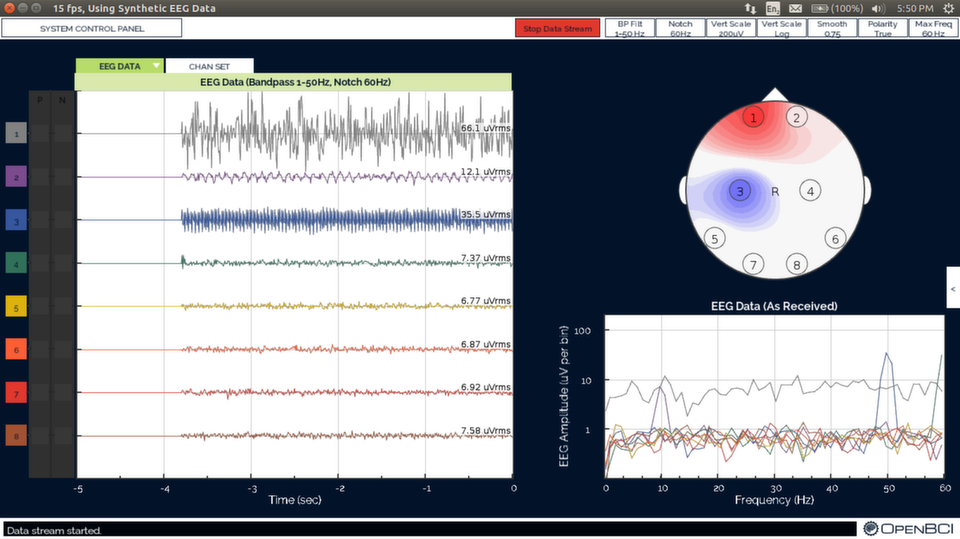
cd ~/application.linux64 && sudo bash OpenBCI_GUI. - Select “SYNTHETIC (algorithmic)” from the list of data sources, and click “Start System”. This starts the display using pre-generated test or “dummy” data that’s included with the program, and is a good first test. After it has initialized, you should see the test data being displayed similarly to the photo below:
Test the Data Link
-
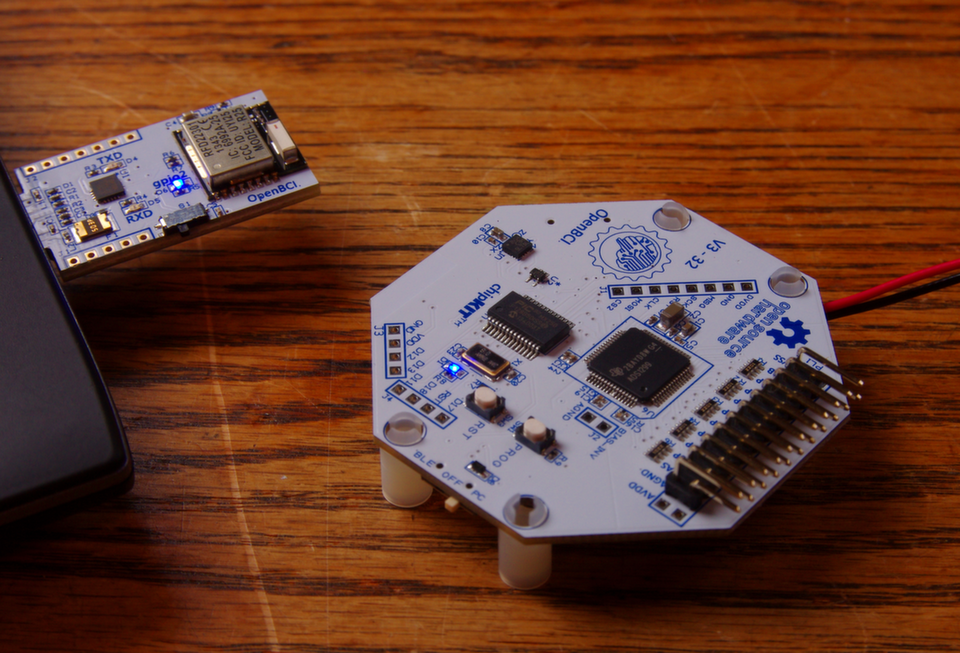
Plug the bluetooth dongle that came with your OpenBCI into a USB port, making sure the dongle’s switch is at the position lablled “GPIO6” (slid toward the computer), as opposed to the “RESET” postion. Its blue indicator light should turn on.
-
With the battery pack plugged in, slide the switch on the OpenBCI to “PC”. It should also have a blue indicator light when it’s turned on. (Note: I’d read that the blue indicator is supposed to flash three times when you turn it on, but this is only for the 8bit boards)
-
Launch the OpenBCI GUI with root privileges again, with the terminal command
cd ~/application.linux64 && sudo bash OpenBCI_GUI -
Select “LIVE (From OpenBCI)” from the list of data sources.
-
Select the correct port for your OpenBCI from the serial/com port list. In my case, after updating jSSC, there was only one, and it was called
/dev/ttyUSB0. -
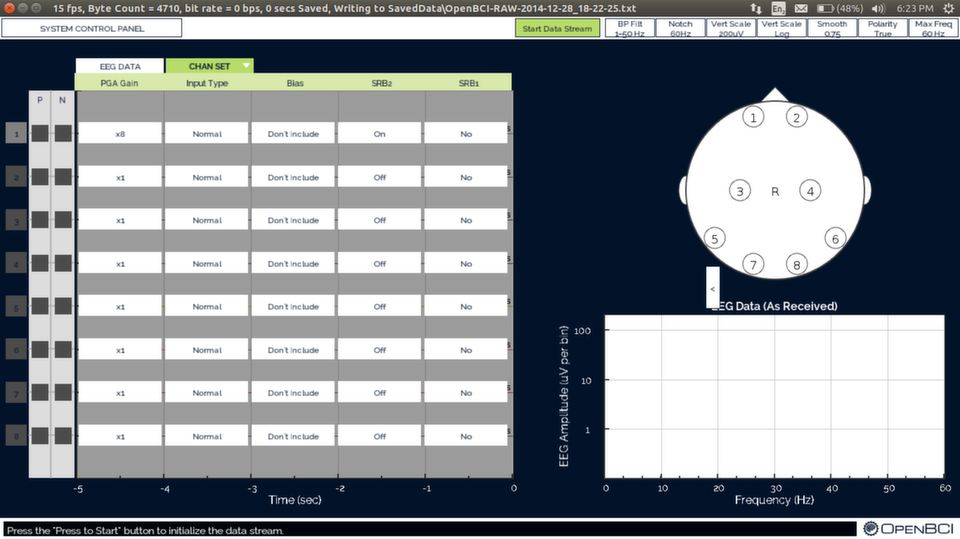
For this test, select “Do not write to SD…” under “WRITE TO SD (Y/N)”. Leave the channel count at 8, and change the log file name if you feel like it. At this point the settings screen should look roughly like this:

-
Click “Start System”, and after the GUI has initialized, “Start Data Stream.”
You should see fairly random data, and when you run your fingers across the electrodes see wild spikes in activity. If you do, the link is working, and we can proceed to the EKG test. When the dongle ↔ OpenBCI board link is active, you’ll see a red indicator on the dongle as well as the blue power light.
Hooking Things Up
For the initial test of an EEG (Electroencephalograph, a device that measures electrical activity in the brain) it’s good to use a strong signal that you’ll recognize if everything’s working. Measuring EKG activity — electrical activity of the heart — is a popular first test, because it has a recognizable pattern and a strong signal. Electrical activity from the heart can be 20–50 times more powerful than from the brain: a typical adult EEG signal is around 10–100 µV, while a healthy EKG signal can be up to a few millivolts.
A full medical Electrocardiogram uses twelve electrodes on the chest, arms, and legs to measure the activity of the different cardiac muscles. The basic EKG we’ll use to test the OpenBCI only needs two electrodes.
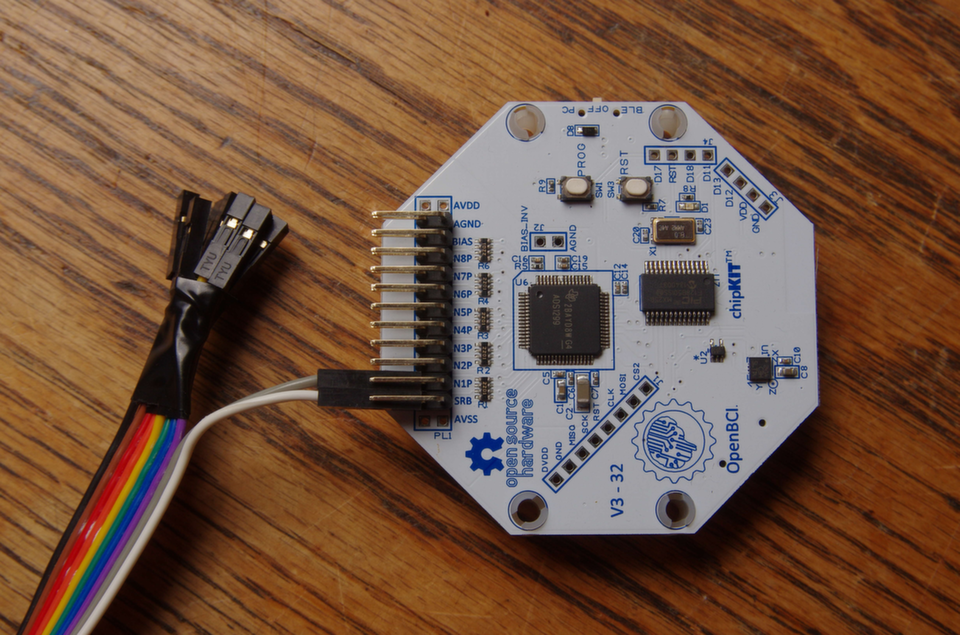
Connect Electrodes to the OpenBCI
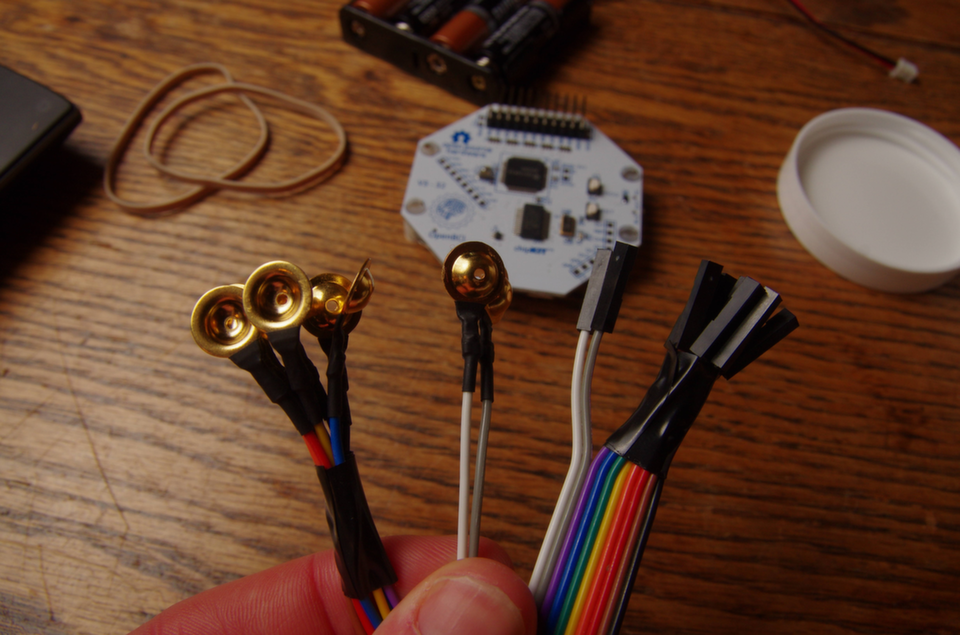
The OpenBCI’s electrode cables are colour coded, and in the software each channel is colour coded as well, which makes it easy to keep track of one signal from the electrode, to the board, and to the software. Channel 1 is grey, channel 2 is purple, channel 3 is blue, channel 4 is green, channel 5 is yellow, channel 6 is orange, channel 7 is red, channel 8 is brown, “SRB” is white, and “BIAS” is black.
The BIAS pin is similar to a ground pin, but it also inserts interference waveforms that cancel out noise. The SRB pin is the default “reference” that other channels can be compared to.
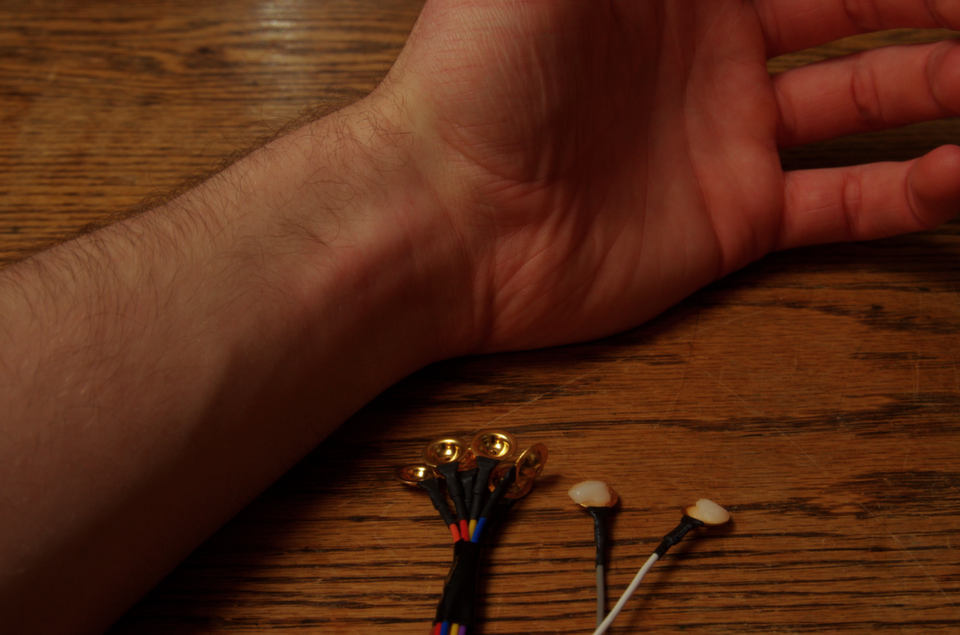
For this test I’m using channel 1 and SRB, so I used the electrodes with the white and grey wires. I recommend taping the remaining electrodes together to keep them out of the way.
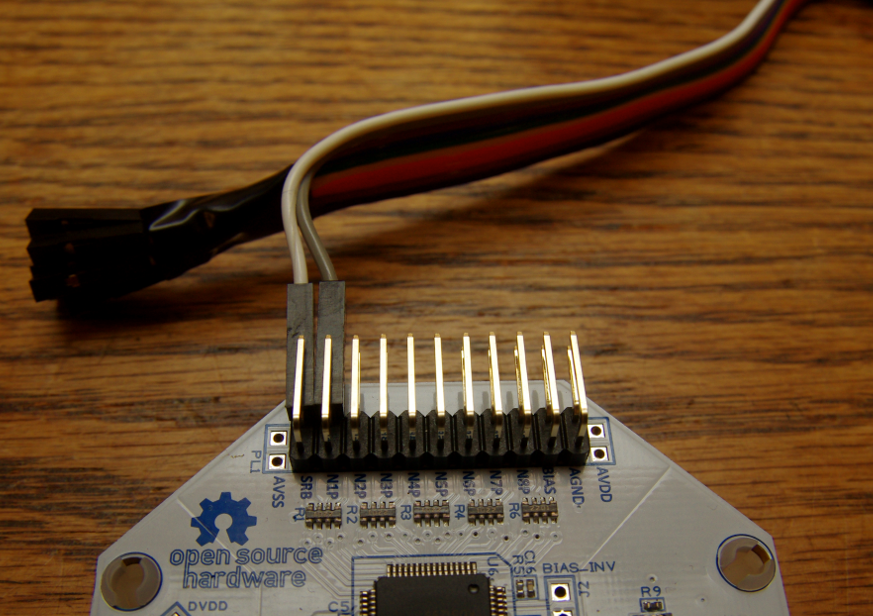
Orient the board you can read the text printed on it. Plug the white electrode’s female connector into the first pin from the left, which is labelled SRB. There are two layers of pins; plug it into the pin closest to the circuit board. Both are labelled SRB, but the upper is SRB1, and the lower is SRB2: SRB2 is the default “reference pin” for the OpenBCI’s inputs, so that’s the one to use.
Plug the grey electrode’s connector into next pin over from SRB2 (also use the lower pin), which is labelled N1P. You can learn more about the two layers of pins and what they’re for on the OpenBCI docs page.
Apply Conductive “10–20” Paste to Electrodes
Clear measurements of electrical activity from internal organs like the brain, heart, and muscles require an excellent electrical connection between the electrodes and skin — the highest resistance link in the signal chain. This is facilitated by cleaning (and sometimes lightly abrading) the skin where the electrodes will be placed, and applying conductive paste to the electrodes to form a flexible connection between the metal and skin.

Additionally, the surface of EEG electrodes are typically made of silver and silver salts, gold, platinum, or other materials with good electrical conductance.
I washed my wrists and lightly abraded them with a dry cloth, though this is optional for an EKG since the signal is quite strong. It’s good to have a small mound of 10–20 paste — even though it’s expensive — or it will settle into the electrode cup without improving the connection.
Apply Electrodes To Wrists and Secure
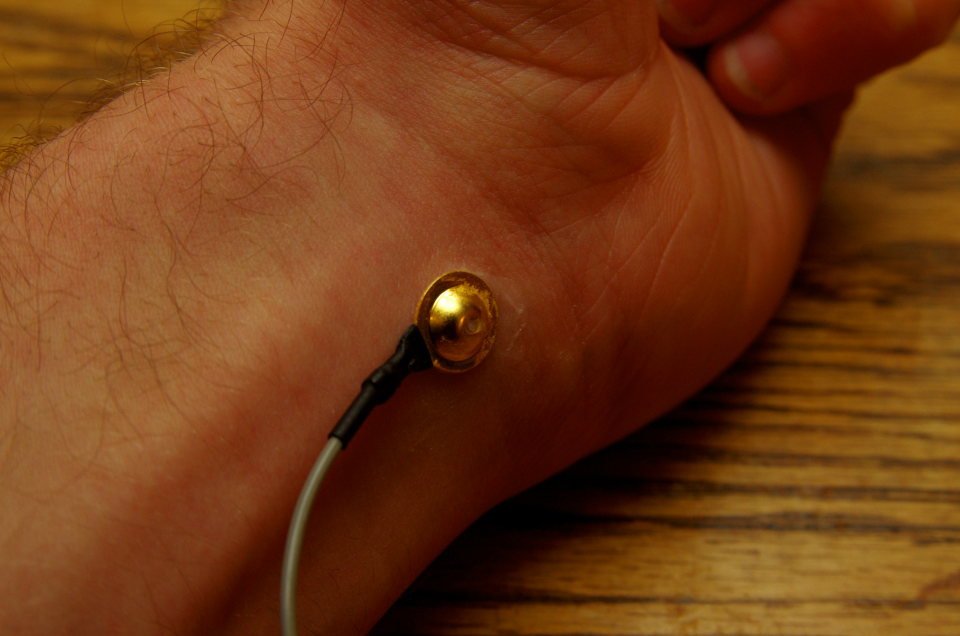
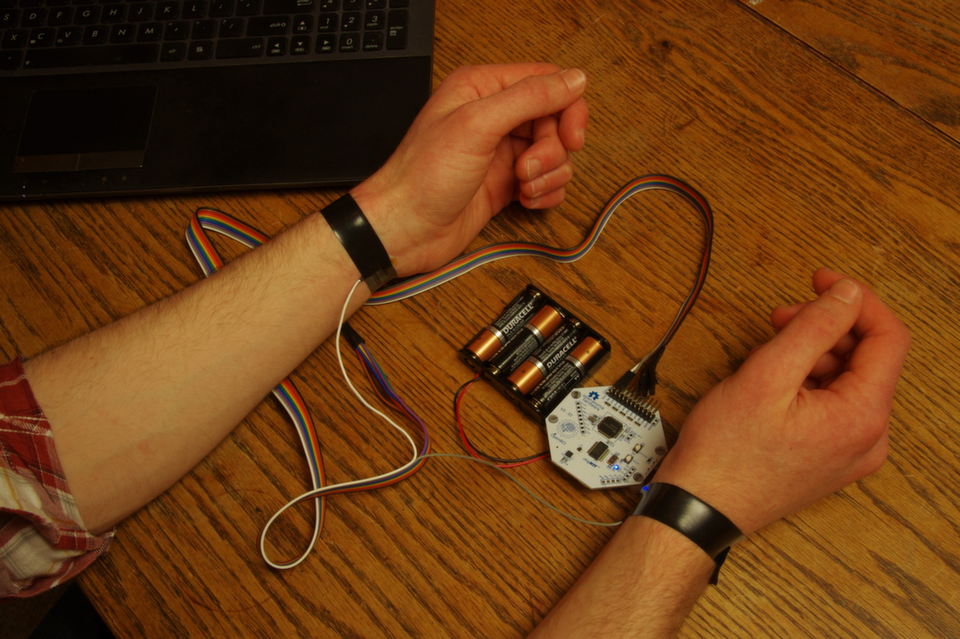
Press the electrode with the grey cable onto the inside of your left wrist, and the white to the same location on your right wrist. By convention, the positive electrode goes on the left wrist and the reference electrode on the right. If you swap them, the signal will appear inverted.
It’s handy to have someone around to help when you hook things up so you don’t dislodge electrodes, especially if you’re trying to take pictures of the process once you’re connected!
I recommend securing the electrodes in some way — unless you can sit completely still and have someone else (who knows what they’re doing!) run the test from this point on.
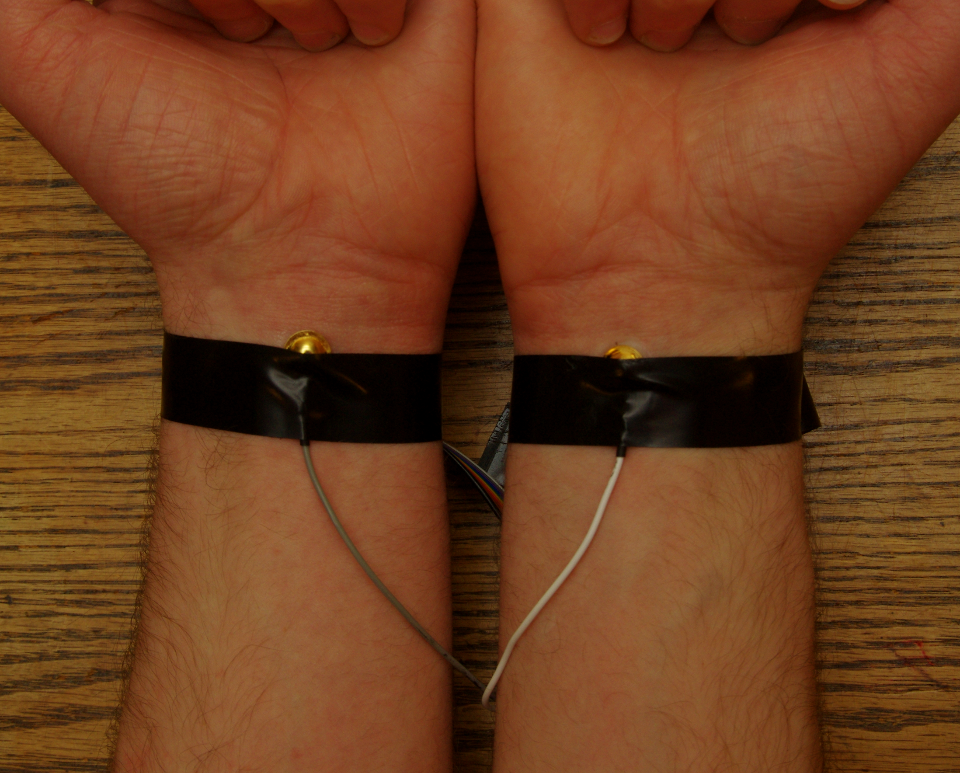
For the first test I used elastic bands, which didn’t work particularly well; for the second, I used electrical tape, leaving half of each electrode uncovered so I could check the connection. If you use my method, be careful not to cut off your circulation. Velcro may be a better method of securing the electrodes, but tape worked well enough for this test.
Power
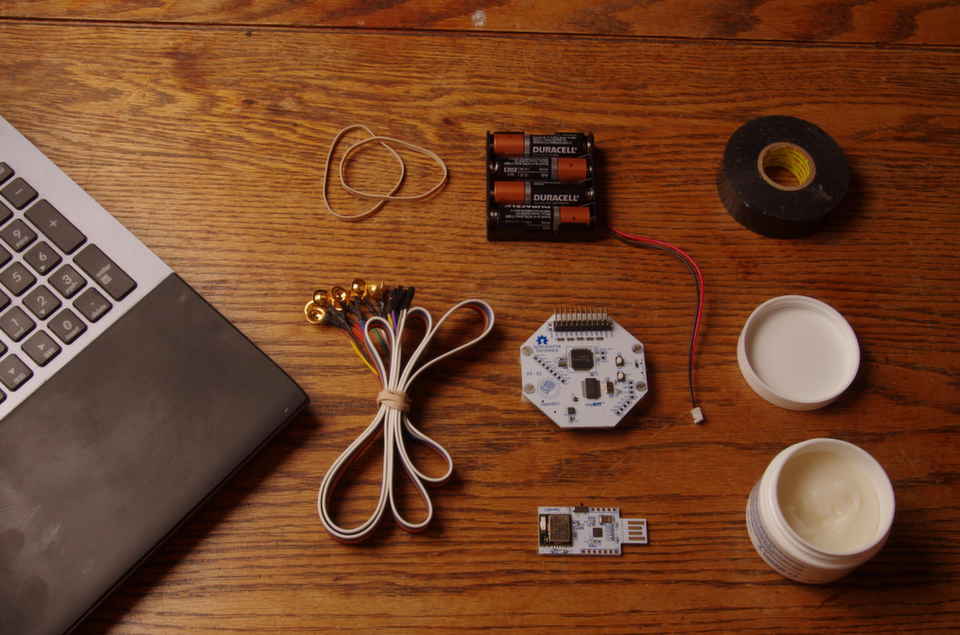
Load the provided battery pack with AAs and plug it into the power port on the underside of the OpenBCI. Although it’d be more convenient to use a power supply, it’s strongly recommended against for safety reasons.
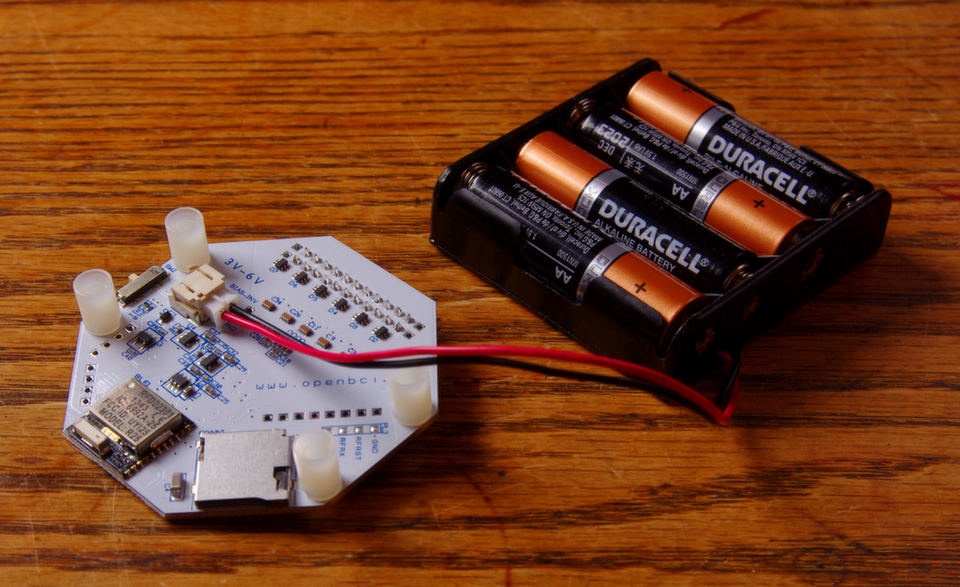
The OpenBCI board and electrodes have no physical connection to any other device. Traditionally, BCIs used mains (110–240v AC) power, but had multiple stages of isolation to prevent mains voltage from reaching the electrodes even if there was a failure in one part of the system.
If the isolation was faulty — which could be caused by an accident, and or faulty design, construction, or materials — high-voltage alternating current would be delivered to the electrodes, and take the path of least resistance to ground: through the brain. This would be extremely dangerous!
For that reason, most modern EEG devices are completely isolated from all sources of high voltage, instead using batteries for power and wireless or bluetooth for data transmission. It isn’t technically necessary if the circuit is properly constructed and in good condition, but when I have electrodes on my head it’s a fail-safe I’m glad to have.
Start the Session
Follow the same steps you used to test the connection at the beginning to start the data stream — plug in the dongle, turn on the OpenBCI, launch the GUI as root, select the correct serial port and settings, and click start system.
Before you start the data stream, turn off the unused channels and set the gain for EKG. On the far left of the screen there are eight coloured, numbered boxes representing the channels. Click on the bottom seven to deactivate them. The buttons will turn grey. This can also be done with keystrokes: pressing keys 2, 3, 4, 5, 6, 7 will turn off those channels, holding down shift and pressing them again turns them back on.
Click the "Chan Set" button at the top of the display area, and set up the channel we’re going to be using: Channel 1. Set the “PDA gain” to 8x, input type to “normal”, BIAS to “don’t include” (since we’re only using two electrodes), SRB2 to “On”, and SRB1 to “No”. The screen should look roughly like this screenshot:
You’re done. Go back to the “EEG Data” tab, and click the “Start Data Stream” button. You’re now recording a basic electrocardiogram!
The Data
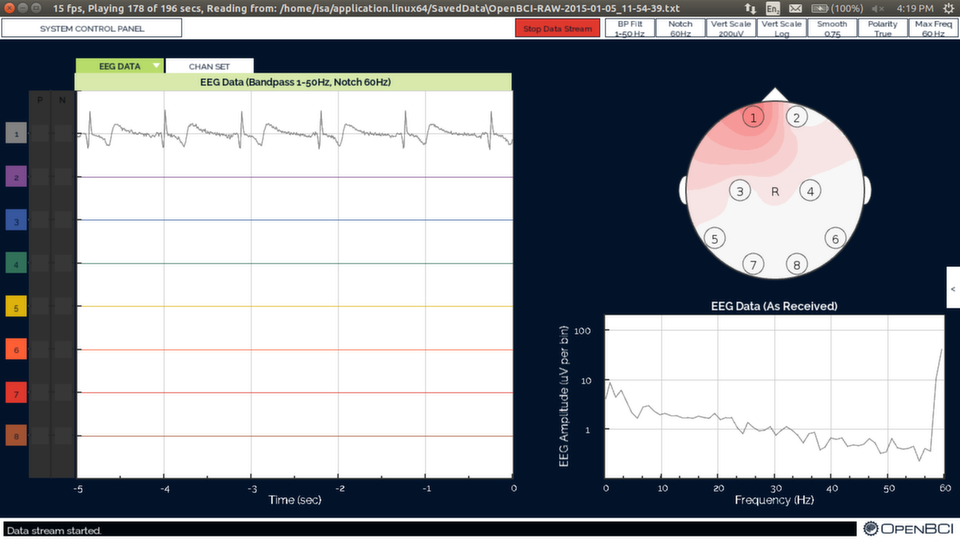
It takes few seconds for the signal to settle out to anything meaningful. Adjust the electrodes as necessary. Although I’m not experienced with EKG, from what I could tell my signal was quite good for such a basic setup.
After the initial run, I put a Micro SD card into the OpenBCI and restarted the GUI, this time setting it to log data to make sure writing to a SD card worked. This seemed to work without any issue, producing two 16MB text files, though I haven’t done any processing on the data yet.
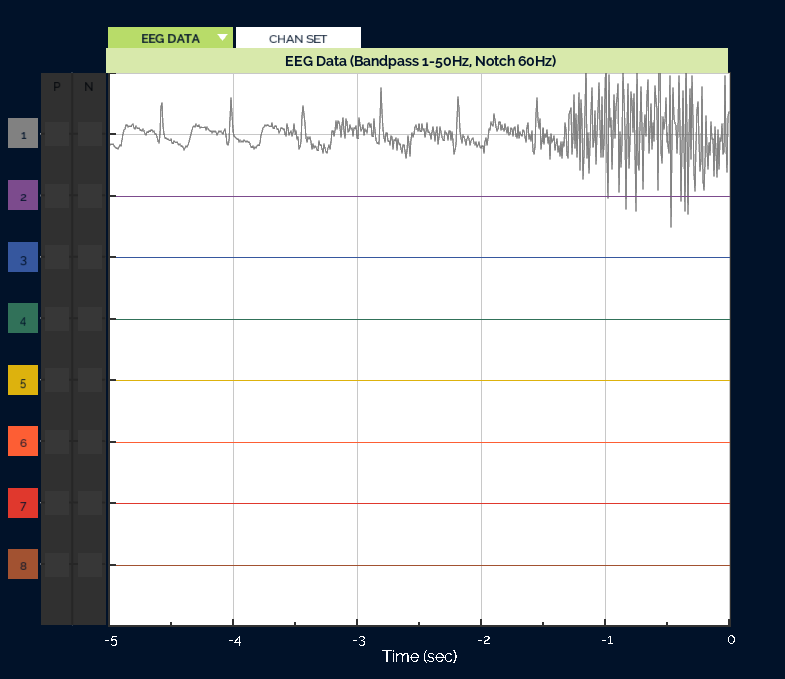
Try slightly tensing muscles in your hands or arms to see what EMG (muscle activity) looks like when it’s contaminating the EKG signal. When I tensed my arm muscles, the signal looked like the image at right.
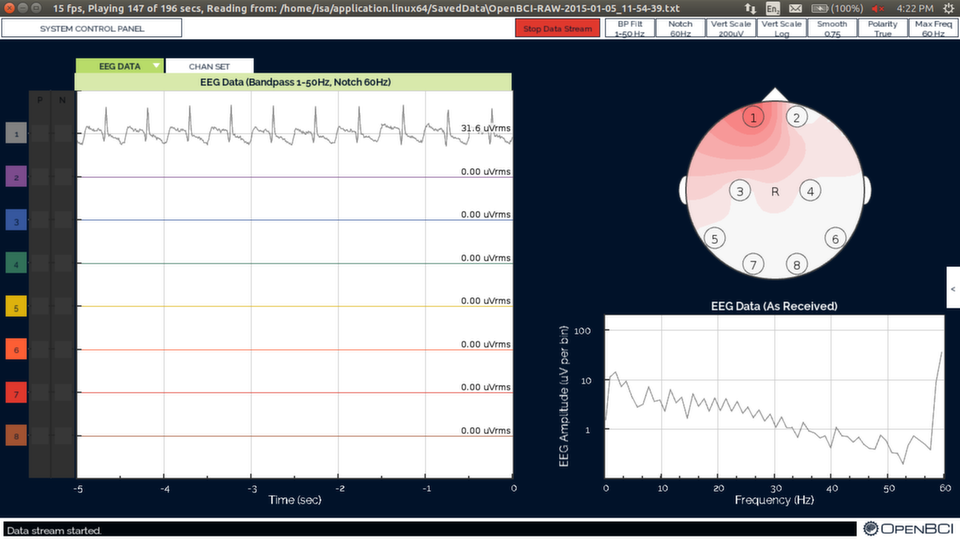
I found I could change my heart rate in quite a short time by changing my breathing. Compare the screenshot below — which, just visually, appears to be in the neighbourhood of 120 beats per minute — to the screenshot at the start of this section, when I was breathing slow and deeply, which I’d estimate at around 60 or 70bpm.
Issues
A few times during my tests, the signal would go crazy, and the GUI would log OpenBCI_ADS1299: errors to the terminal saying apparent sampleIndex jump from Serial data. The problem seems to be from corrupted/missing packets in the serial data; unfortunately, I haven’t managed to track down the cause.
Clean Up

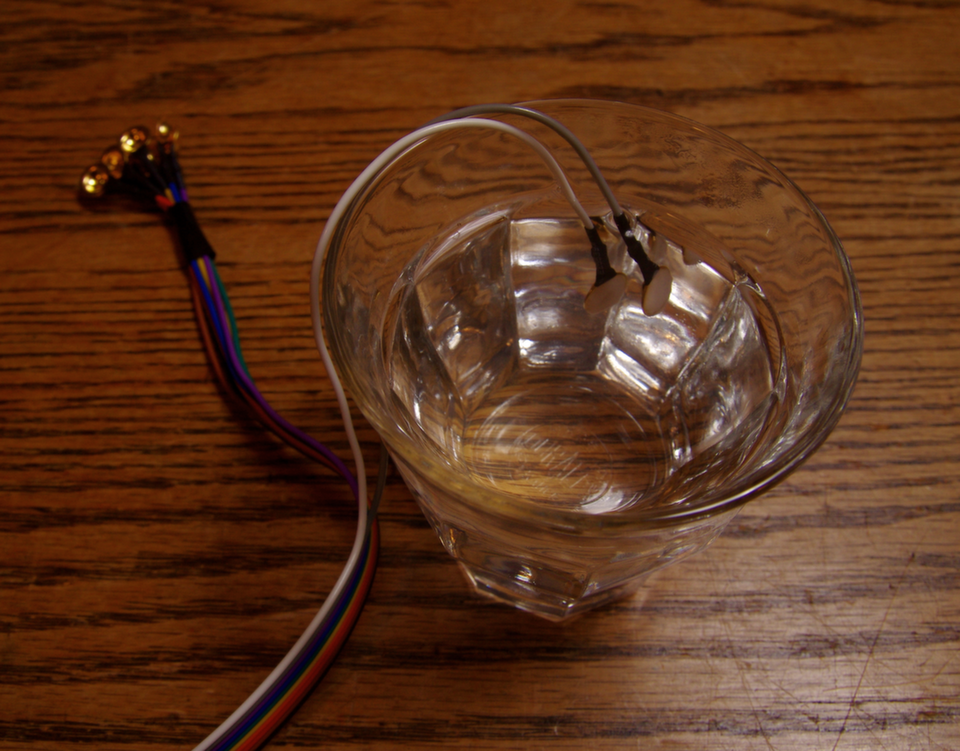
When you’re done, clean the conductive paste from the electrodes to prevent them from corroding: Dunk the electrodes you used in near-boiling water a few times, making sure that the paste is all dissolved, then dry them and put them away. Leaving them soaking isn’t recommended, as the dissolved paste can damage the connection between the lead and electrode.
Wipe the leftover paste from your wrists while you’re at it; the container doesn’t say what’s in it, and it’s probably not good for you.
Conclusion
Hopefully this will help you take your initial OpenBCI recordings and minimize time spent dealing with technical issues.
Next up: brainwaves! I’ll probably start with the easiest type to measure, alpha (7.5–12.5 Hz) activity over the occipital lobe (the back of the head), and publish my results, or perhaps a tutorial, here. Subscribe to our RSS feed of leave your email below to be notified when upcoming articles and tutorials are published!
If you have any questions, suggestions, or have noticed errors, just leave a comment below and I’ll do my best to help out. You can also use the contact page, if that’s more your thing. Thanks for reading!